<Raspberry Pi-41>
戦車制御の製作は<Raspberry Pi-36>で紹介しましたが、今回はZero Wで製作しました。
Zero Wは、wifi内臓ですので、かなりコンパクトに出来そうです。
タブレットで操作しやすいように、制御ボタン、スライダーを大きくしました。
今回は、webカメラ非搭載で、別途設置したwebカメラで戦車走行の様子を制御タブレットで見る
次にwebカメラを搭載し、そのカメラで走行中に撮影した映像を制御タブレットで見る。
この2つを紹介します。
(mjpg_streamerとwebiopiはインストールしておく参考ページ)
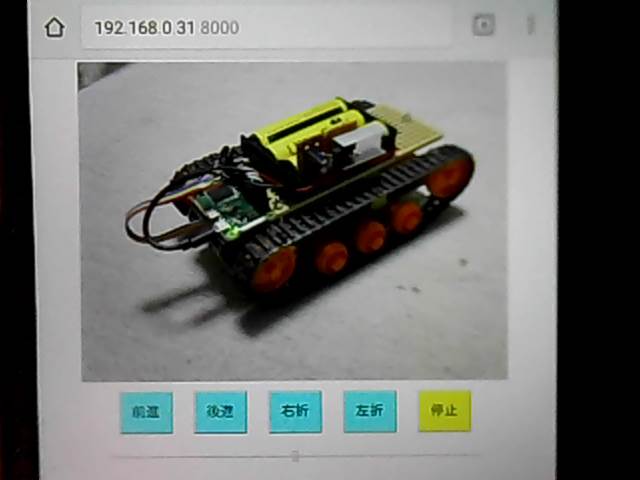
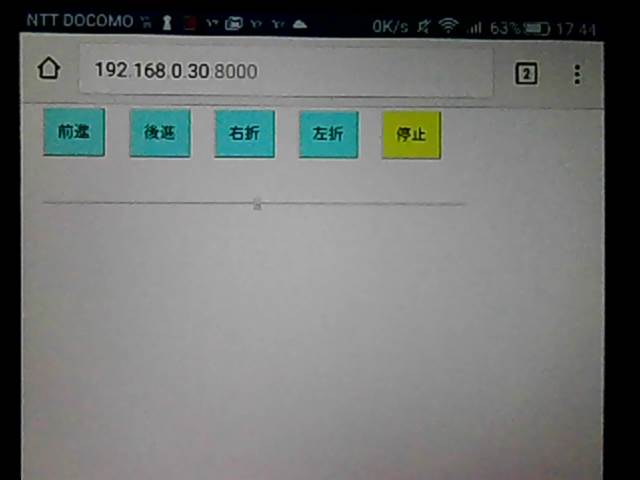
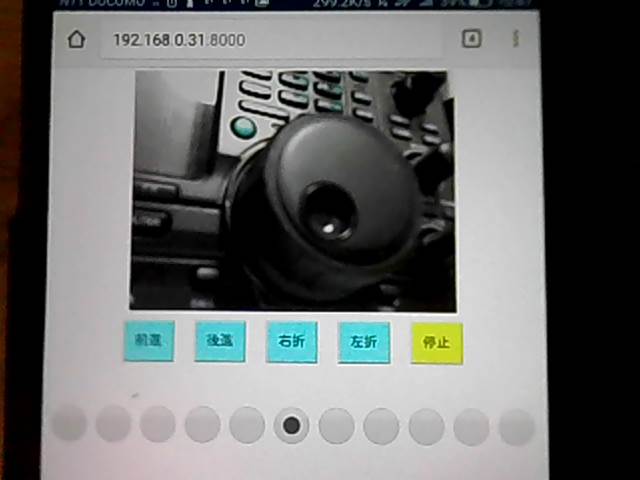
<webカメラ非搭載> タブレット操作画面(クリックして下さい)
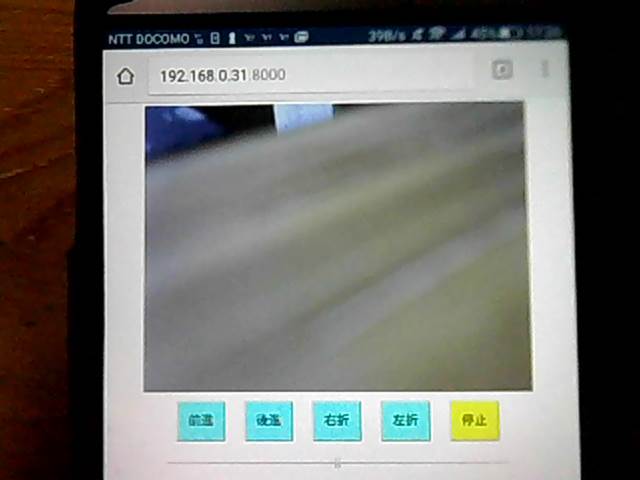
 <webカメラ搭載> タブレット操作画面(クリックして下さい)
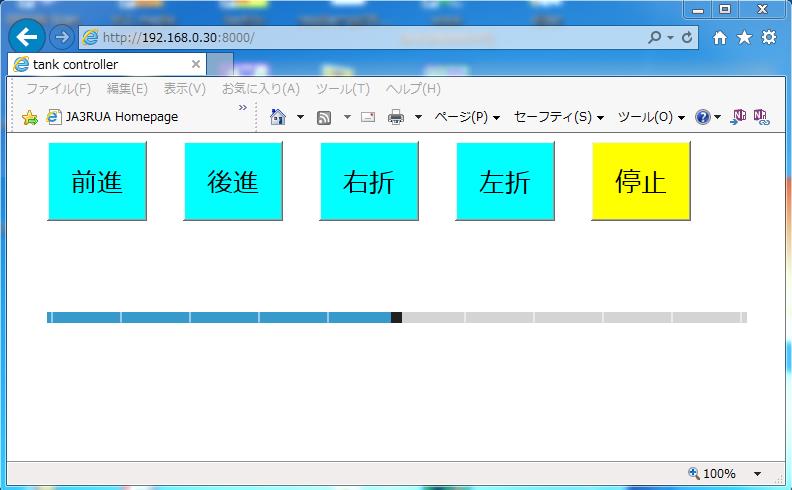
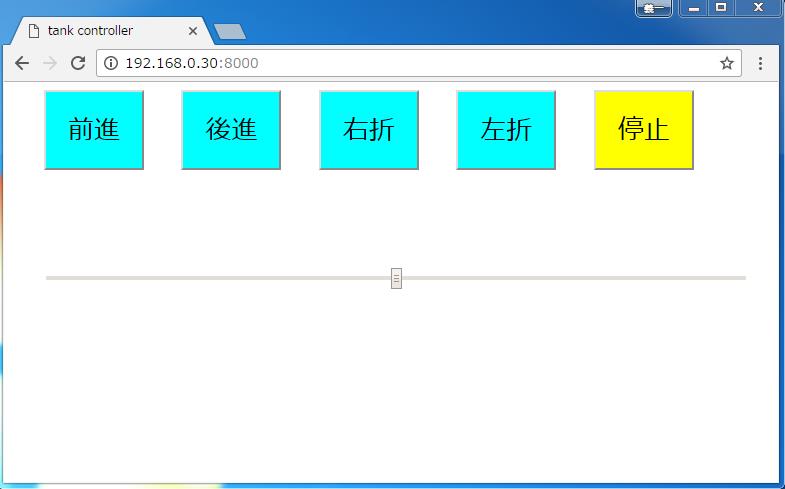
 タブレット操作画面ですが、O.Sの違いにより表示が違います。特にスライダー部品の形が変化しています。
左から、タブレットAndroid、win7 IE11、win7 Chrome
タブレット操作画面ですが、O.Sの違いにより表示が違います。特にスライダー部品の形が変化しています。
左から、タブレットAndroid、win7 IE11、win7 Chrome
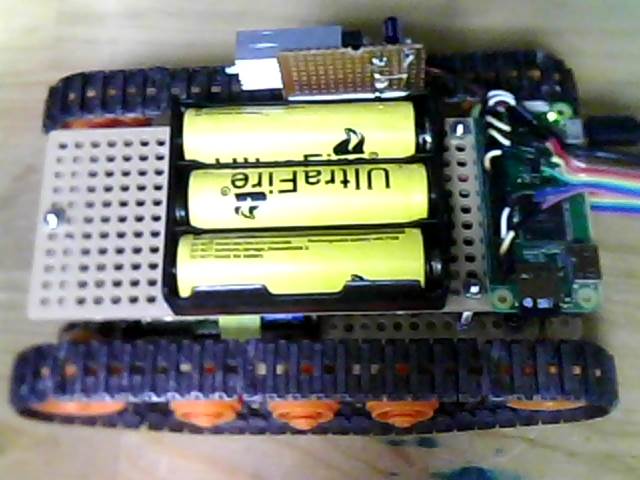
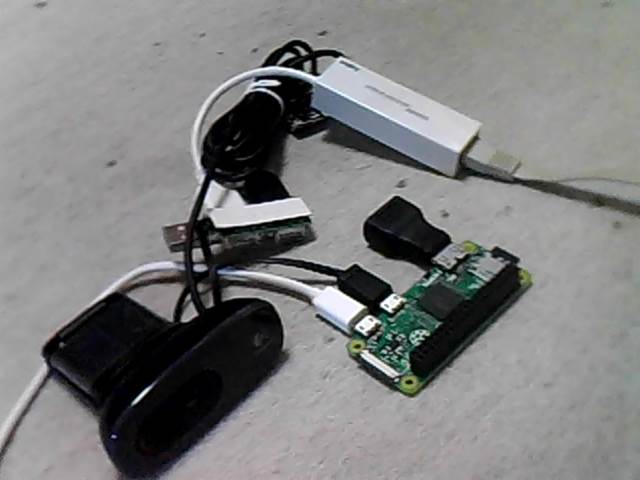
 <webカメラ非搭載>は、下の画像のように
別途設置したwebカメラを動かす為のRaspberry Piが必要です。
(webカメラ側:IPアドレスは192.168.0.30 戦車側:IPアドレスは192.168.0.31)
<webカメラ非搭載>は、下の画像のように
別途設置したwebカメラを動かす為のRaspberry Piが必要です。
(webカメラ側:IPアドレスは192.168.0.30 戦車側:IPアドレスは192.168.0.31)
 そして、mjpg_streamerを起動させておく必要があります。
/etc/rc.localのファイルにmjpg_streamerを動かす記述をしておけばRaspberry Pi起動時に
自動でmjpg_streamerが起動します。
ここでは、スクリプトで記述しています。
下の##←ここ2行を追加しています。
-------------------------rc.local-------------------------------------
#!/bin/sh -e
#
# rc.local
#
# This script is executed at the end of each multiuser runlevel.
# Make sure that the script will "exit 0" on success or any other
# value on error.
#
# In order to enable or disable this script just change the execution
# bits.
#
# By default this script does nothing.
# Print the IP address
_IP=$(hostname -I) || true
if [ "$_IP" ]; then
printf "My IP address is %s\n" "$_IP"
fi
cd /home/pi/webcamera ##←ここ1/2
sudo ./webcamera.sh ##←ここ2/2
exit 0
----------------------------------------------------------------------
/home/piの下にwebcameraのフォルダを作成して、その中にwebcamera.shの
スクリプトファイルを置きます。(フォルダは任意)
-------------------------webcamera.sh---------------------------------
#!/bin/sh
##変数での記述
PORT="8080"
#ID="raspi"
#PW="0000"
#SIZE="320x240"
SIZE="800x600"
FRAMERATE="48"
LD_LIBRARY_PATH=/usr/local/lib \
mjpg_streamer \
-b -i "input_uvc.so -f $FRAMERATE -r $SIZE -d /dev/video0 -y" \
-o "output_http.so -w /home/pi/webcamera -p $PORT"
----------------------------------------------------------------------
次に、本体側のRaspberry Pi Zero Wのindex.htmlとscript.pyですが
/etc/webiopi/configファイルに、フォルダの指定を記述します。下の##←の2ヶ所
--------------------config--------------------------------------------
・
・ 途中省略
・
[SCRIPTS]
# Load custom scripts syntax :
# name = sourcefile
# each sourcefile may have setup, loop and destroy functions and macros
#myscript = /home/pi/webiopi/examples/scripts/macros/script.py
myscript = /home/pi/tnk_v5/script.py ##←ここにscript.py
#------------------------------------------------------------------------#
[HTTP]
# HTTP Server configuration
enabled = true
port = 8000
# File containing sha256(base64("user:password"))
# Use webiopi-passwd command to generate it
#passwd-file = /etc/webiopi/passwd
# Change login prompt message
prompt = "WebIOPi"
# Use doc-root to change default HTML and resource files location
#doc-root = /home/pi/webiopi/examples/scripts/macros
doc-root = /home/pi/tnk_v5 ##←index.htmlを置くフォルダ
# Use welcome-file to change the default "Welcome" file
#welcome-file = index.html
・
・ 途中省略
・
---------------------------------------------------------------------------
index.html(大文字の<は半角に修正して下さい)
--------------------index.html---------------------------------------------
<!DOCTYPE html>
<html lang="ja">
<head>
<meta charset="UTF-8">
<title>戦車制御</title>
<!--2017.04.04 ja3rua -->
<script type="text/javascript" src="/webiopi.js"></script>
<script>
webiopi().ready( function(){
control( 0 ); //制御初期 停止ボタン
Speedlevel( 5 ); //speed初期値(pwmのデューティ比))
} );
function control(mode){
webiopi().callMacro( "Controlmode", mode ); // control 0:停止 1:前進 2:後進 3:右折 4:左折
}
function Speedlevel(level){
webiopi().callMacro( "Speedlevel", level); // Speed制御
}
function changeValue(value) {
Speedlevel(value)
}
</script>
<style>
.class1 {
width: 100px;
height: 80px;
background-color:aqua;
color:black;
font-size:26px
}
#id5 {
background-color:yellow
}
.class1:hover{background-color:white
}
#id5:hover{background-color:white
}
</style>
</head>
<body>
<!-- 下記の記述でmjpg-stremerの動画配信する(家庭内LAN)-->
<center>
<img src="http://192.168.0.30:8080/?action=stream" />
</center>
<br>
<center>
<input class="class1" id="id1" type="button" value="前進" onclick="control(1)" >
<input class="class1" id="id2" type="button" value="後進" onclick="control(2)" >
<input class="class1" id="id3" type="button" value="右折" onclick="control(3)" >
<input class="class1" id="id4" type="button" value="左折" onclick="control(4)" >
<input class="class1" id="id5" type="button" value="停止" onclick="control(0)" >
</center>
<br><br>
center>
<input type="range" min="0" max="10" step="1" value="5" onchange="changeValue(this.value)" style="width:700px">
</center>
</body>
</html>
------------------------------------------------------------------
script.py(大文字の<は半角に修正して下さい)
--------------------script.py-------------------------------------
import webiopi
GPIO = webiopi.GPIO
R_IN1 = 12
R_IN2 = 16
L_IN1 = 20
L_IN2 = 21
SPEED_PWM = 25
GPIO.setFunction( R_IN1 , GPIO.OUT )
GPIO.setFunction( R_IN2, GPIO.OUT )
GPIO.setFunction( L_IN1, GPIO.OUT )
GPIO.setFunction( L_IN2, GPIO.OUT )
GPIO.setFunction( SPEED_PWM, GPIO.PWM )
def pinclear():
GPIO.pwmWrite(R_IN1, 0 )
GPIO.pwmWrite(R_IN2, 0 )
GPIO.pwmWrite(L_IN1, 0 )
GPIO.pwmWrite(L_IN2, 0 )
#onclick="drive(1)で呼び出される
#<form><input type="button" value="Forward" onclick="drive(1)" data-role="none"></form>
@webiopi.macro
def Controlmode( mode ):
if mode == "0":
pinclear()
elif mode == "1":
pinclear()
GPIO.digitalWrite(R_IN1, GPIO.HIGH )
GPIO.digitalWrite(L_IN1, GPIO.HIGH )
elif mode == "2":
pinclear()
GPIO.digitalWrite(R_IN2, GPIO.HIGH )
GPIO.digitalWrite(L_IN2, GPIO.HIGH )
elif mode == "3":
pinclear()
GPIO.digitalWrite(L_IN1, GPIO.HIGH )
GPIO.digitalWrite(R_IN2, GPIO.HIGH )
elif mode == "4":
pinclear()
GPIO.digitalWrite(R_IN1, GPIO.HIGH )
GPIO.digitalWrite(L_IN2, GPIO.HIGH )
@webiopi.macro
def Speedlevel( level ):
GPIO.pwmWrite( SPEED_PWM, int(level)/10 )
------------------------------------------------------------------
以上、準備出来たら別タブレット(windows7 PC)で、http://192.168.0.31:8000/で接続します。
以上が、<webカメラ非搭載>に必要なファイルと内容です。
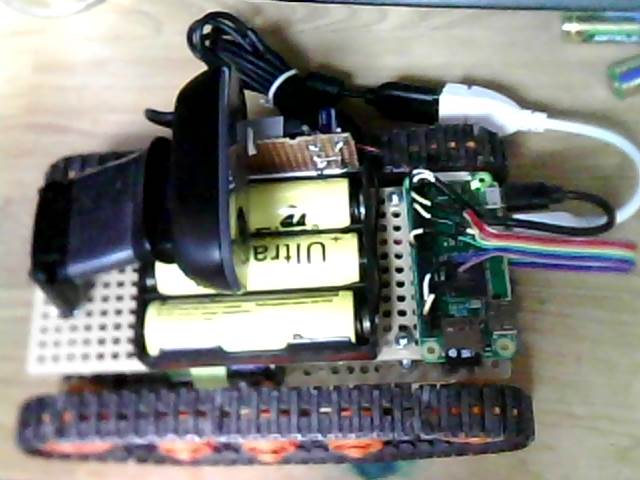
次に<webカメラ搭載>ですが、もちろん「別途設置したwebカメラを動かす為のRaspberry Pi」は必要ありません。
そして、ファイルなど全て<webカメラ非搭載>と同じですが1つだけ違うのはindex.htmlの1箇所だけです。
下のIPアドレスを訂正するだけです。
<img src="http://192.168.0.30:8080/?action=stream" />
↓
<img src="http://192.168.0.31:8080/?action=stream" />
以上、準備出来たら別タブレット(windows7 PC)で、http://192.168.0.31:8000/で接続します。
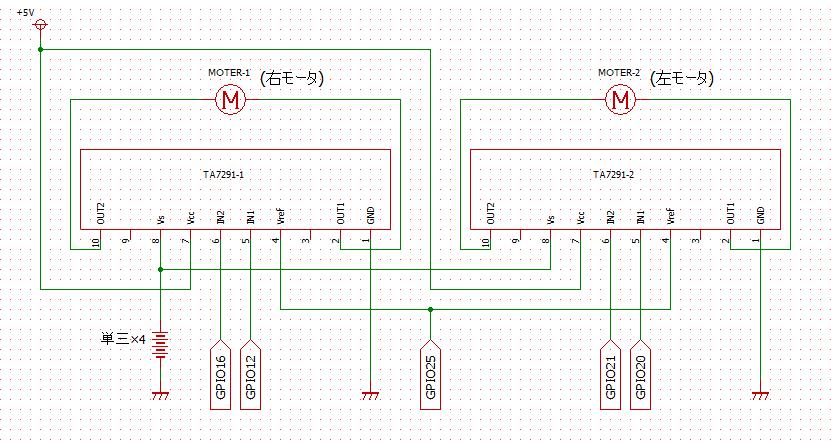
<回路図>
そして、mjpg_streamerを起動させておく必要があります。
/etc/rc.localのファイルにmjpg_streamerを動かす記述をしておけばRaspberry Pi起動時に
自動でmjpg_streamerが起動します。
ここでは、スクリプトで記述しています。
下の##←ここ2行を追加しています。
-------------------------rc.local-------------------------------------
#!/bin/sh -e
#
# rc.local
#
# This script is executed at the end of each multiuser runlevel.
# Make sure that the script will "exit 0" on success or any other
# value on error.
#
# In order to enable or disable this script just change the execution
# bits.
#
# By default this script does nothing.
# Print the IP address
_IP=$(hostname -I) || true
if [ "$_IP" ]; then
printf "My IP address is %s\n" "$_IP"
fi
cd /home/pi/webcamera ##←ここ1/2
sudo ./webcamera.sh ##←ここ2/2
exit 0
----------------------------------------------------------------------
/home/piの下にwebcameraのフォルダを作成して、その中にwebcamera.shの
スクリプトファイルを置きます。(フォルダは任意)
-------------------------webcamera.sh---------------------------------
#!/bin/sh
##変数での記述
PORT="8080"
#ID="raspi"
#PW="0000"
#SIZE="320x240"
SIZE="800x600"
FRAMERATE="48"
LD_LIBRARY_PATH=/usr/local/lib \
mjpg_streamer \
-b -i "input_uvc.so -f $FRAMERATE -r $SIZE -d /dev/video0 -y" \
-o "output_http.so -w /home/pi/webcamera -p $PORT"
----------------------------------------------------------------------
次に、本体側のRaspberry Pi Zero Wのindex.htmlとscript.pyですが
/etc/webiopi/configファイルに、フォルダの指定を記述します。下の##←の2ヶ所
--------------------config--------------------------------------------
・
・ 途中省略
・
[SCRIPTS]
# Load custom scripts syntax :
# name = sourcefile
# each sourcefile may have setup, loop and destroy functions and macros
#myscript = /home/pi/webiopi/examples/scripts/macros/script.py
myscript = /home/pi/tnk_v5/script.py ##←ここにscript.py
#------------------------------------------------------------------------#
[HTTP]
# HTTP Server configuration
enabled = true
port = 8000
# File containing sha256(base64("user:password"))
# Use webiopi-passwd command to generate it
#passwd-file = /etc/webiopi/passwd
# Change login prompt message
prompt = "WebIOPi"
# Use doc-root to change default HTML and resource files location
#doc-root = /home/pi/webiopi/examples/scripts/macros
doc-root = /home/pi/tnk_v5 ##←index.htmlを置くフォルダ
# Use welcome-file to change the default "Welcome" file
#welcome-file = index.html
・
・ 途中省略
・
---------------------------------------------------------------------------
index.html(大文字の<は半角に修正して下さい)
--------------------index.html---------------------------------------------
<!DOCTYPE html>
<html lang="ja">
<head>
<meta charset="UTF-8">
<title>戦車制御</title>
<!--2017.04.04 ja3rua -->
<script type="text/javascript" src="/webiopi.js"></script>
<script>
webiopi().ready( function(){
control( 0 ); //制御初期 停止ボタン
Speedlevel( 5 ); //speed初期値(pwmのデューティ比))
} );
function control(mode){
webiopi().callMacro( "Controlmode", mode ); // control 0:停止 1:前進 2:後進 3:右折 4:左折
}
function Speedlevel(level){
webiopi().callMacro( "Speedlevel", level); // Speed制御
}
function changeValue(value) {
Speedlevel(value)
}
</script>
<style>
.class1 {
width: 100px;
height: 80px;
background-color:aqua;
color:black;
font-size:26px
}
#id5 {
background-color:yellow
}
.class1:hover{background-color:white
}
#id5:hover{background-color:white
}
</style>
</head>
<body>
<!-- 下記の記述でmjpg-stremerの動画配信する(家庭内LAN)-->
<center>
<img src="http://192.168.0.30:8080/?action=stream" />
</center>
<br>
<center>
<input class="class1" id="id1" type="button" value="前進" onclick="control(1)" >
<input class="class1" id="id2" type="button" value="後進" onclick="control(2)" >
<input class="class1" id="id3" type="button" value="右折" onclick="control(3)" >
<input class="class1" id="id4" type="button" value="左折" onclick="control(4)" >
<input class="class1" id="id5" type="button" value="停止" onclick="control(0)" >
</center>
<br><br>
center>
<input type="range" min="0" max="10" step="1" value="5" onchange="changeValue(this.value)" style="width:700px">
</center>
</body>
</html>
------------------------------------------------------------------
script.py(大文字の<は半角に修正して下さい)
--------------------script.py-------------------------------------
import webiopi
GPIO = webiopi.GPIO
R_IN1 = 12
R_IN2 = 16
L_IN1 = 20
L_IN2 = 21
SPEED_PWM = 25
GPIO.setFunction( R_IN1 , GPIO.OUT )
GPIO.setFunction( R_IN2, GPIO.OUT )
GPIO.setFunction( L_IN1, GPIO.OUT )
GPIO.setFunction( L_IN2, GPIO.OUT )
GPIO.setFunction( SPEED_PWM, GPIO.PWM )
def pinclear():
GPIO.pwmWrite(R_IN1, 0 )
GPIO.pwmWrite(R_IN2, 0 )
GPIO.pwmWrite(L_IN1, 0 )
GPIO.pwmWrite(L_IN2, 0 )
#onclick="drive(1)で呼び出される
#<form><input type="button" value="Forward" onclick="drive(1)" data-role="none"></form>
@webiopi.macro
def Controlmode( mode ):
if mode == "0":
pinclear()
elif mode == "1":
pinclear()
GPIO.digitalWrite(R_IN1, GPIO.HIGH )
GPIO.digitalWrite(L_IN1, GPIO.HIGH )
elif mode == "2":
pinclear()
GPIO.digitalWrite(R_IN2, GPIO.HIGH )
GPIO.digitalWrite(L_IN2, GPIO.HIGH )
elif mode == "3":
pinclear()
GPIO.digitalWrite(L_IN1, GPIO.HIGH )
GPIO.digitalWrite(R_IN2, GPIO.HIGH )
elif mode == "4":
pinclear()
GPIO.digitalWrite(R_IN1, GPIO.HIGH )
GPIO.digitalWrite(L_IN2, GPIO.HIGH )
@webiopi.macro
def Speedlevel( level ):
GPIO.pwmWrite( SPEED_PWM, int(level)/10 )
------------------------------------------------------------------
以上、準備出来たら別タブレット(windows7 PC)で、http://192.168.0.31:8000/で接続します。
以上が、<webカメラ非搭載>に必要なファイルと内容です。
次に<webカメラ搭載>ですが、もちろん「別途設置したwebカメラを動かす為のRaspberry Pi」は必要ありません。
そして、ファイルなど全て<webカメラ非搭載>と同じですが1つだけ違うのはindex.htmlの1箇所だけです。
下のIPアドレスを訂正するだけです。
<img src="http://192.168.0.30:8080/?action=stream" />
↓
<img src="http://192.168.0.31:8080/?action=stream" />
以上、準備出来たら別タブレット(windows7 PC)で、http://192.168.0.31:8000/で接続します。
<回路図>
 <番外編>
速度制御にスライダーを使う以外に、htmlのinputタグを使うやり方を紹介します。
ボタンが11個で0から10%ステップづつの100%までPWMの可変が出来ます。
<番外編>
速度制御にスライダーを使う以外に、htmlのinputタグを使うやり方を紹介します。
ボタンが11個で0から10%ステップづつの100%までPWMの可変が出来ます。
 index.html(大文字の<は半角に修正して下さい)
--------------------index.html----------------------------------------------------------------------
<!DOCTYPE html>
<html lang="ja">
<head>
<meta charset="UTF-8">
<meta http-equiv="Content-Style-Type" content="text/css">
<title>戦車制御</title>
<style>
.class1{width: 100px;
height: 80px;
background-color:aqua;
color:black;
font-size:26px}
#id5{background-color:yellow}
.class1:hover{background-color:white}
#id5:hover{background-color:white}
.class2{width: 70px;
height: 70px;
background-color:aqua}
</style>
<script type="text/javascript" src="/webiopi.js"></script>
<script>
webiopi().ready( function(){ //前後右左停と速度の初期設定はここで下のように関数(引数)で行う
control(0); //前:1 後:2 右:3 左:4 停:0
speed(5); //速度 0:0 1:0.1 2:0.2 3:0.3 4:0.4 5:0.5 6:0.6 7:0.7 8:0.8 9:0.9 10:1.0(pwmのデューティ比))
} );
function control(mode){
webiopi().callMacro( "controlmode", mode ); // control 0:停止 1:前進 2:後進 3:右折 4:左折
}
//引数名のlevelはscript.pyのdef speedlevel(level):およびif文の中も同じにする
function speed(level){
webiopi().callMacro( "speedlevel", level); // Speed制御
}
</script>
</head>
<body>
<!-- 下記の記述でmjpg-stremerの動画配信する(家庭内LAN)-->
<center>
<img src="http://192.168.0.31:8080/?action=stream" />
</center>
<br>
<!-- 前後左右制御-->
<CENTER>
<input class="class1" id="id1" type="button" value="前進" onclick="control(1)" >
<input class="class1" id="id2" type="button" value="後進" onclick="control(2)" >
<input class="class1" id="id3" type="button" value="右折" onclick="control(3)" >
<input class="class1" id="id4" type="button" value="左折" onclick="control(4)" >
<input class="class1" id="id5" type="button" value="停止" onclick="control(0)" >
</CENTER>
<br><br><br><br><br>
<!--速度制御 -->
<CENTER>
<input class="class2" type="radio" name="speed" onclick="speed(0)" >
<input class="class2" type="radio" name="speed" onclick="speed(1)" >
<input class="class2" type="radio" name="speed" onclick="speed(2)" >
<input class="class2" type="radio" name="speed" onclick="speed(3)" >
<input class="class2" type="radio" name="speed" onclick="speed(4)" >
<input class="class2" type="radio" name="speed" onclick="speed(5)" checked>
<input class="class2" type="radio" name="speed" onclick="speed(6)" >
<input class="class2" type="radio" name="speed" onclick="speed(7)" >
<input class="class2" type="radio" name="speed" onclick="speed(8)" >
<input class="class2" type="radio" name="speed" onclick="speed(9)" >
<input class="class2" type="radio" name="speed" onclick="speed(10)" >
</CENTER>
</body>
</html>
-------------------------------------------------------------------------------------------
script.py(大文字の<は半角に修正して下さい)
--------------------script.py--------------------------------------------------------------
import webiopi
GPIO = webiopi.GPIO
R_IN1 = 12
R_IN2 = 16
L_IN1 = 20
L_IN2 = 21
SPEED_PWM = 25
GPIO.setFunction( R_IN1, GPIO.OUT )
GPIO.setFunction( R_IN2, GPIO.OUT )
GPIO.setFunction( L_IN1, GPIO.OUT )
GPIO.setFunction( L_IN2, GPIO.OUT )
GPIO.setFunction( SPEED_PWM, GPIO.PWM )
#GPIO.pwmWrite(R_IN1, 0 )
#GPIO.pwmWrite(R_IN2, 0 )
#GPIO.pwmWrite(L_IN1, 0 )
#GPIO.pwmWrite(L_IN2, 0 )
#GPIO.pwmWrite( SPEED_PWM, 0.3 ) #初期設定
def pinclear():
GPIO.pwmWrite(R_IN1, 0 )
GPIO.pwmWrite(R_IN2, 0 )
GPIO.pwmWrite(L_IN1, 0 )
GPIO.pwmWrite(L_IN2, 0 )
#onclick="drive(1)で呼び出される
#<form><input type="button" value="Forward" onclick="drive(1)" data-role="none"></form>
@webiopi.macro
def controlmode( mode ):
if mode == "0":
pinclear()
elif mode == "1":
pinclear()
GPIO.digitalWrite(R_IN1, GPIO.HIGH )
GPIO.digitalWrite(L_IN1, GPIO.HIGH )
elif mode == "2":
pinclear()
GPIO.digitalWrite(R_IN2, GPIO.HIGH )
GPIO.digitalWrite(L_IN2, GPIO.HIGH )
elif mode == "3":
pinclear()
GPIO.digitalWrite(R_IN1, GPIO.HIGH )
GPIO.digitalWrite(L_IN2, GPIO.HIGH )
elif mode == "4":
pinclear()
GPIO.digitalWrite(L_IN1, GPIO.HIGH )
GPIO.digitalWrite(R_IN2, GPIO.HIGH )
@webiopi.macro
def speedlevel(level):
if level == "0":
GPIO.pwmWrite( SPEED_PWM, 0 )
elif level == "1":
GPIO.pwmWrite( SPEED_PWM, 0.1 )
elif level == "2":
GPIO.pwmWrite( SPEED_PWM, 0.2 )
elif level == "3":
GPIO.pwmWrite( SPEED_PWM, 0.3 )
elif level == "4":
GPIO.pwmWrite( SPEED_PWM, 0.4 )
elif level == "5":
GPIO.pwmWrite( SPEED_PWM, 0.5 )
elif level == "6":
GPIO.pwmWrite( SPEED_PWM, 0.6 )
elif level == "7":
GPIO.pwmWrite( SPEED_PWM, 0.7 )
elif level == "8":
GPIO.pwmWrite( SPEED_PWM, 0.8 )
elif level == "9":
GPIO.pwmWrite( SPEED_PWM, 0.9 )
elif level == "10":
GPIO.pwmWrite( SPEED_PWM, 1.0 )
-------------------------------------------------------------------------------------------
Raspberry Pi-42に続く・・・
Raspberry メニューに戻る
index.html(大文字の<は半角に修正して下さい)
--------------------index.html----------------------------------------------------------------------
<!DOCTYPE html>
<html lang="ja">
<head>
<meta charset="UTF-8">
<meta http-equiv="Content-Style-Type" content="text/css">
<title>戦車制御</title>
<style>
.class1{width: 100px;
height: 80px;
background-color:aqua;
color:black;
font-size:26px}
#id5{background-color:yellow}
.class1:hover{background-color:white}
#id5:hover{background-color:white}
.class2{width: 70px;
height: 70px;
background-color:aqua}
</style>
<script type="text/javascript" src="/webiopi.js"></script>
<script>
webiopi().ready( function(){ //前後右左停と速度の初期設定はここで下のように関数(引数)で行う
control(0); //前:1 後:2 右:3 左:4 停:0
speed(5); //速度 0:0 1:0.1 2:0.2 3:0.3 4:0.4 5:0.5 6:0.6 7:0.7 8:0.8 9:0.9 10:1.0(pwmのデューティ比))
} );
function control(mode){
webiopi().callMacro( "controlmode", mode ); // control 0:停止 1:前進 2:後進 3:右折 4:左折
}
//引数名のlevelはscript.pyのdef speedlevel(level):およびif文の中も同じにする
function speed(level){
webiopi().callMacro( "speedlevel", level); // Speed制御
}
</script>
</head>
<body>
<!-- 下記の記述でmjpg-stremerの動画配信する(家庭内LAN)-->
<center>
<img src="http://192.168.0.31:8080/?action=stream" />
</center>
<br>
<!-- 前後左右制御-->
<CENTER>
<input class="class1" id="id1" type="button" value="前進" onclick="control(1)" >
<input class="class1" id="id2" type="button" value="後進" onclick="control(2)" >
<input class="class1" id="id3" type="button" value="右折" onclick="control(3)" >
<input class="class1" id="id4" type="button" value="左折" onclick="control(4)" >
<input class="class1" id="id5" type="button" value="停止" onclick="control(0)" >
</CENTER>
<br><br><br><br><br>
<!--速度制御 -->
<CENTER>
<input class="class2" type="radio" name="speed" onclick="speed(0)" >
<input class="class2" type="radio" name="speed" onclick="speed(1)" >
<input class="class2" type="radio" name="speed" onclick="speed(2)" >
<input class="class2" type="radio" name="speed" onclick="speed(3)" >
<input class="class2" type="radio" name="speed" onclick="speed(4)" >
<input class="class2" type="radio" name="speed" onclick="speed(5)" checked>
<input class="class2" type="radio" name="speed" onclick="speed(6)" >
<input class="class2" type="radio" name="speed" onclick="speed(7)" >
<input class="class2" type="radio" name="speed" onclick="speed(8)" >
<input class="class2" type="radio" name="speed" onclick="speed(9)" >
<input class="class2" type="radio" name="speed" onclick="speed(10)" >
</CENTER>
</body>
</html>
-------------------------------------------------------------------------------------------
script.py(大文字の<は半角に修正して下さい)
--------------------script.py--------------------------------------------------------------
import webiopi
GPIO = webiopi.GPIO
R_IN1 = 12
R_IN2 = 16
L_IN1 = 20
L_IN2 = 21
SPEED_PWM = 25
GPIO.setFunction( R_IN1, GPIO.OUT )
GPIO.setFunction( R_IN2, GPIO.OUT )
GPIO.setFunction( L_IN1, GPIO.OUT )
GPIO.setFunction( L_IN2, GPIO.OUT )
GPIO.setFunction( SPEED_PWM, GPIO.PWM )
#GPIO.pwmWrite(R_IN1, 0 )
#GPIO.pwmWrite(R_IN2, 0 )
#GPIO.pwmWrite(L_IN1, 0 )
#GPIO.pwmWrite(L_IN2, 0 )
#GPIO.pwmWrite( SPEED_PWM, 0.3 ) #初期設定
def pinclear():
GPIO.pwmWrite(R_IN1, 0 )
GPIO.pwmWrite(R_IN2, 0 )
GPIO.pwmWrite(L_IN1, 0 )
GPIO.pwmWrite(L_IN2, 0 )
#onclick="drive(1)で呼び出される
#<form><input type="button" value="Forward" onclick="drive(1)" data-role="none"></form>
@webiopi.macro
def controlmode( mode ):
if mode == "0":
pinclear()
elif mode == "1":
pinclear()
GPIO.digitalWrite(R_IN1, GPIO.HIGH )
GPIO.digitalWrite(L_IN1, GPIO.HIGH )
elif mode == "2":
pinclear()
GPIO.digitalWrite(R_IN2, GPIO.HIGH )
GPIO.digitalWrite(L_IN2, GPIO.HIGH )
elif mode == "3":
pinclear()
GPIO.digitalWrite(R_IN1, GPIO.HIGH )
GPIO.digitalWrite(L_IN2, GPIO.HIGH )
elif mode == "4":
pinclear()
GPIO.digitalWrite(L_IN1, GPIO.HIGH )
GPIO.digitalWrite(R_IN2, GPIO.HIGH )
@webiopi.macro
def speedlevel(level):
if level == "0":
GPIO.pwmWrite( SPEED_PWM, 0 )
elif level == "1":
GPIO.pwmWrite( SPEED_PWM, 0.1 )
elif level == "2":
GPIO.pwmWrite( SPEED_PWM, 0.2 )
elif level == "3":
GPIO.pwmWrite( SPEED_PWM, 0.3 )
elif level == "4":
GPIO.pwmWrite( SPEED_PWM, 0.4 )
elif level == "5":
GPIO.pwmWrite( SPEED_PWM, 0.5 )
elif level == "6":
GPIO.pwmWrite( SPEED_PWM, 0.6 )
elif level == "7":
GPIO.pwmWrite( SPEED_PWM, 0.7 )
elif level == "8":
GPIO.pwmWrite( SPEED_PWM, 0.8 )
elif level == "9":
GPIO.pwmWrite( SPEED_PWM, 0.9 )
elif level == "10":
GPIO.pwmWrite( SPEED_PWM, 1.0 )
-------------------------------------------------------------------------------------------
Raspberry Pi-42に続く・・・
Raspberry メニューに戻る