<Raspberry Pi-54>
Raspberry Pi-51とPi-53を組み合わせたものを紹介します。
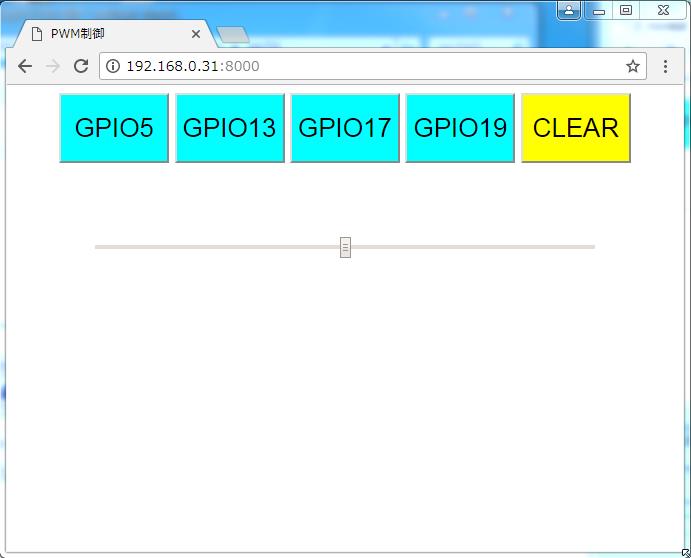
GPIO5,GPIO13,GPIO17,GPIO19のボタンで、スイッチ操作をさせて、スライダー(GPIO25)で
モーターの回転数制御(電球の調光)が出来るので、玩具のタンク、車など応用範囲が
拡がると思います。(Raspberry Pi-36 -39 -41参照)
 必要ファイルはconfig、index.htmlとscript.pyで、/home/pi/webiopi_kisoフォルダを作成し
ここに置きます。
それでは、下記の①②③を行っていきます。
①/etc/webiopi/configファイルで、index.htmlとscript.pyを/home/pi/webiopi_kisoフォルダに置く設定をします。
(下の←←←←←ここですを追加)
#------------------------------------------------------------------------#
[SCRIPTS]
# Load custom scripts syntax :
# name = sourcefile
# each sourcefile may have setup, loop and destroy functions and macros
#myscript = /home/pi/webiopi/examples/scripts/macros/script.py
myscript = /home/pi/webiopi_kiso/script.py #←←←←←ここです
#------------------------------------------------------------------------#
[HTTP]
# HTTP Server configuration
enabled = true
port = 8000
# File containing sha256(base64("user:password"))
# Use webiopi-passwd command to generate it
passwd-file = /etc/webiopi/passwd
# Change login prompt message
prompt = "WebIOPi"
# Use doc-root to change default HTML and resource files location
#doc-root = /home/pi/webiopi/examples/scripts/macros
doc-root = /home/pi/webiopi_kiso #←←←←←ここです
# Use welcome-file to change the default "Welcome" file
#welcome-file = index.html
#------------------------------------------------------------------------#
②index.html(<は半角に修正のこと)
-------------------------------------------------------------------------------
<!DOCTYPE html>
<html lang="ja">
<head>
<meta charset="UTF-8">
<meta http-equiv="Content-Style-Type" content="text/css">
<title>PWM制御</title>
<style>
/*下の<input class="class1" id="idx" type="button" value="GPIO5" onclick="control(x)" >の
ボタンのサイズ・色を設定*/
/*上位.class1を指定しているので、ボタン全部の指定*/
.class1 {
width: 110px;
height: 70px;
background-color:aqua;
color:black;
font-size:26px
}
/*下位指定なのでid5だけ別の色に指定*/
#id5 {
background-color:yellow
}
/*.class1のボタンにカーソルが乗ると色を変える*/
.class1:hover{background-color:white}
/*id5のボタンにカーソルが乗ると色を変える*/
#id5:hover{background-color:white}
</style>
<script type="text/javascript" src="/webiopi.js"></script>
<script>
function control(mode){
webiopi().callMacro( "Controlmode", mode ); //
}
//webiopi起動時のSpeedlevel値の設定
webiopi().ready( function(){
Speedlevel( 50 ); //speed初期値(pwmのデューティ比))
} );
//スライダを使ったときのSpeedlevel値の設定
function changeValue(value) {
Speedlevel(value);
}
//Speedlevel値をscript.pyに渡す
function Speedlevel(level){
webiopi().callMacro( "Speedlevel", level); // Speed制御
}
</script>
</head>
<body>
<center>
<input class="class1" id="id1" type="button" value="GPIO5" onclick="control(1)" >
<input class="class1" id="id2" type="button" value="GPIO13" onclick="control(2)" >
<input class="class1" id="id3" type="button" value="GPIO17" onclick="control(3)" >
<input class="class1" id="id4" type="button" value="GPIO19" onclick="control(4)" >
<input class="class1" id="id5" type="button" value="CLEAR" onclick="control(0)" >
</center>
<br><br><br>
<center>
<input type="range" min="0" max="100" step="1" value="50" onchange="changeValue(this.value)" style="width:500px">
</center>
</body>
</html>
-------------------------------------------------------------------------------
③script.py
-------------------------------------------------------------------------------
import webiopi
GPIO = webiopi.GPIO
SW1 = 5
SW2 = 13
SW3 = 17
SW4 = 19
GPIO.setFunction( SW1, GPIO.OUT )
GPIO.setFunction( SW2, GPIO.OUT )
GPIO.setFunction( SW3, GPIO.OUT )
GPIO.setFunction( SW4, GPIO.OUT )
def pinclear():
GPIO.pwmWrite(SW1, 0 )
GPIO.pwmWrite(SW2, 0 )
GPIO.pwmWrite(SW3, 0 )
GPIO.pwmWrite(SW4, 0 )
@webiopi.macro
def Controlmode( mode ):
if mode == "0":
pinclear()
if mode == "1":
pinclear()
GPIO.digitalWrite(SW1, GPIO.HIGH )
if mode == "2":
pinclear()
GPIO.digitalWrite(SW2, GPIO.HIGH )
if mode == "3":
pinclear()
GPIO.digitalWrite(SW3, GPIO.HIGH )
if mode == "4":
pinclear()
GPIO.digitalWrite(SW4, GPIO.HIGH )
SPEED_PWM = 25
GPIO.setFunction( SPEED_PWM, GPIO.PWM )
@webiopi.macro
def Speedlevel(dc):
GPIO.pwmWrite( SPEED_PWM, int(dc)/100 )
-------------------------------------------------------------------------------
webiopiを起動させます、コマンドラインから、下のように打ち込みます。
pi@raspberrypi:~ $ sudo /etc/init.d/webiopi start
停止はstartをstopにする
そして、webブラウザから、http://192.168.0.30:8000/にアクセスするとスライダーが
表示します。(IPアドレスは自分の環境)
また、Raspberry Piの電源ON時に自動起動させるには、下記の/etc/rc.localファイルの
←ここを追加をすれば、自動で起動します。
/etc/rc.local
---------------------------------------------------------------------
#!/bin/sh -e
#
# rc.local
#
# This script is executed at the end of each multiuser runlevel.
# Make sure that the script will "exit 0" on success or any other
# value on error.
#
# In order to enable or disable this script just change the execution
# bits.
#
# By default this script does nothing.
# Print the IP address
_IP=$(hostname -I) || true
if [ "$_IP" ]; then
printf "My IP address is %s\n" "$_IP"
fi
sudo /etc/init.d/webiopi start #←ここを追加
exit 0
---------------------------------------------------------------------
<参考>
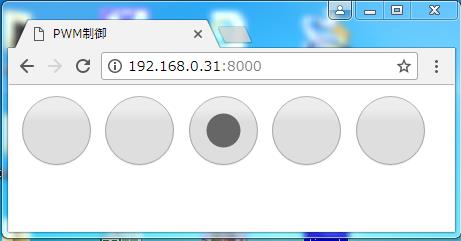
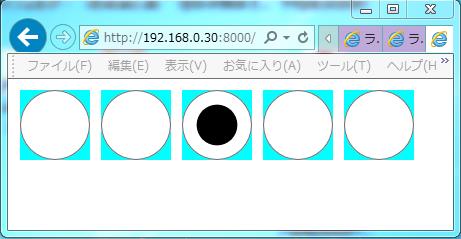
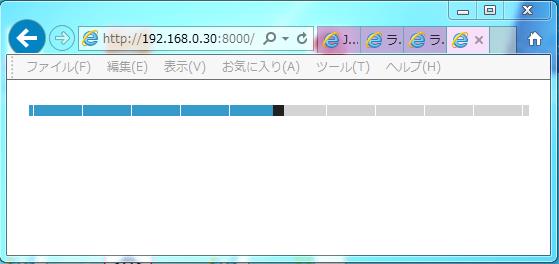
webブラウザのchromeとIE11では、PWM制御方法のボタンとスライダーでは、ブラウザでの
見え方が違います。(スイッチ操作のGPIO5,GPIO13,GPIO17,GPIO19,CLEARのボタンは同じでした)
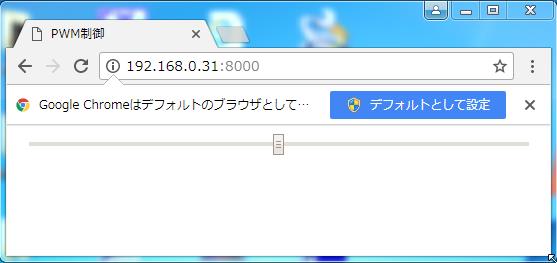
また、見え方意外に、chromeでは、マウスボタンの左をクリックしながらドラッグして
マウスボタンを放したときにPWM出力が反映しますが、IE11では、マウスボタンの左をクリックして
ドラッグ中にPWM出力が反映するので、IE11のほうが使い勝手は良いと感じました。
PWM制御方法:ボタン chrome PWM制御方法:ボタン IE11
必要ファイルはconfig、index.htmlとscript.pyで、/home/pi/webiopi_kisoフォルダを作成し
ここに置きます。
それでは、下記の①②③を行っていきます。
①/etc/webiopi/configファイルで、index.htmlとscript.pyを/home/pi/webiopi_kisoフォルダに置く設定をします。
(下の←←←←←ここですを追加)
#------------------------------------------------------------------------#
[SCRIPTS]
# Load custom scripts syntax :
# name = sourcefile
# each sourcefile may have setup, loop and destroy functions and macros
#myscript = /home/pi/webiopi/examples/scripts/macros/script.py
myscript = /home/pi/webiopi_kiso/script.py #←←←←←ここです
#------------------------------------------------------------------------#
[HTTP]
# HTTP Server configuration
enabled = true
port = 8000
# File containing sha256(base64("user:password"))
# Use webiopi-passwd command to generate it
passwd-file = /etc/webiopi/passwd
# Change login prompt message
prompt = "WebIOPi"
# Use doc-root to change default HTML and resource files location
#doc-root = /home/pi/webiopi/examples/scripts/macros
doc-root = /home/pi/webiopi_kiso #←←←←←ここです
# Use welcome-file to change the default "Welcome" file
#welcome-file = index.html
#------------------------------------------------------------------------#
②index.html(<は半角に修正のこと)
-------------------------------------------------------------------------------
<!DOCTYPE html>
<html lang="ja">
<head>
<meta charset="UTF-8">
<meta http-equiv="Content-Style-Type" content="text/css">
<title>PWM制御</title>
<style>
/*下の<input class="class1" id="idx" type="button" value="GPIO5" onclick="control(x)" >の
ボタンのサイズ・色を設定*/
/*上位.class1を指定しているので、ボタン全部の指定*/
.class1 {
width: 110px;
height: 70px;
background-color:aqua;
color:black;
font-size:26px
}
/*下位指定なのでid5だけ別の色に指定*/
#id5 {
background-color:yellow
}
/*.class1のボタンにカーソルが乗ると色を変える*/
.class1:hover{background-color:white}
/*id5のボタンにカーソルが乗ると色を変える*/
#id5:hover{background-color:white}
</style>
<script type="text/javascript" src="/webiopi.js"></script>
<script>
function control(mode){
webiopi().callMacro( "Controlmode", mode ); //
}
//webiopi起動時のSpeedlevel値の設定
webiopi().ready( function(){
Speedlevel( 50 ); //speed初期値(pwmのデューティ比))
} );
//スライダを使ったときのSpeedlevel値の設定
function changeValue(value) {
Speedlevel(value);
}
//Speedlevel値をscript.pyに渡す
function Speedlevel(level){
webiopi().callMacro( "Speedlevel", level); // Speed制御
}
</script>
</head>
<body>
<center>
<input class="class1" id="id1" type="button" value="GPIO5" onclick="control(1)" >
<input class="class1" id="id2" type="button" value="GPIO13" onclick="control(2)" >
<input class="class1" id="id3" type="button" value="GPIO17" onclick="control(3)" >
<input class="class1" id="id4" type="button" value="GPIO19" onclick="control(4)" >
<input class="class1" id="id5" type="button" value="CLEAR" onclick="control(0)" >
</center>
<br><br><br>
<center>
<input type="range" min="0" max="100" step="1" value="50" onchange="changeValue(this.value)" style="width:500px">
</center>
</body>
</html>
-------------------------------------------------------------------------------
③script.py
-------------------------------------------------------------------------------
import webiopi
GPIO = webiopi.GPIO
SW1 = 5
SW2 = 13
SW3 = 17
SW4 = 19
GPIO.setFunction( SW1, GPIO.OUT )
GPIO.setFunction( SW2, GPIO.OUT )
GPIO.setFunction( SW3, GPIO.OUT )
GPIO.setFunction( SW4, GPIO.OUT )
def pinclear():
GPIO.pwmWrite(SW1, 0 )
GPIO.pwmWrite(SW2, 0 )
GPIO.pwmWrite(SW3, 0 )
GPIO.pwmWrite(SW4, 0 )
@webiopi.macro
def Controlmode( mode ):
if mode == "0":
pinclear()
if mode == "1":
pinclear()
GPIO.digitalWrite(SW1, GPIO.HIGH )
if mode == "2":
pinclear()
GPIO.digitalWrite(SW2, GPIO.HIGH )
if mode == "3":
pinclear()
GPIO.digitalWrite(SW3, GPIO.HIGH )
if mode == "4":
pinclear()
GPIO.digitalWrite(SW4, GPIO.HIGH )
SPEED_PWM = 25
GPIO.setFunction( SPEED_PWM, GPIO.PWM )
@webiopi.macro
def Speedlevel(dc):
GPIO.pwmWrite( SPEED_PWM, int(dc)/100 )
-------------------------------------------------------------------------------
webiopiを起動させます、コマンドラインから、下のように打ち込みます。
pi@raspberrypi:~ $ sudo /etc/init.d/webiopi start
停止はstartをstopにする
そして、webブラウザから、http://192.168.0.30:8000/にアクセスするとスライダーが
表示します。(IPアドレスは自分の環境)
また、Raspberry Piの電源ON時に自動起動させるには、下記の/etc/rc.localファイルの
←ここを追加をすれば、自動で起動します。
/etc/rc.local
---------------------------------------------------------------------
#!/bin/sh -e
#
# rc.local
#
# This script is executed at the end of each multiuser runlevel.
# Make sure that the script will "exit 0" on success or any other
# value on error.
#
# In order to enable or disable this script just change the execution
# bits.
#
# By default this script does nothing.
# Print the IP address
_IP=$(hostname -I) || true
if [ "$_IP" ]; then
printf "My IP address is %s\n" "$_IP"
fi
sudo /etc/init.d/webiopi start #←ここを追加
exit 0
---------------------------------------------------------------------
<参考>
webブラウザのchromeとIE11では、PWM制御方法のボタンとスライダーでは、ブラウザでの
見え方が違います。(スイッチ操作のGPIO5,GPIO13,GPIO17,GPIO19,CLEARのボタンは同じでした)
また、見え方意外に、chromeでは、マウスボタンの左をクリックしながらドラッグして
マウスボタンを放したときにPWM出力が反映しますが、IE11では、マウスボタンの左をクリックして
ドラッグ中にPWM出力が反映するので、IE11のほうが使い勝手は良いと感じました。
PWM制御方法:ボタン chrome PWM制御方法:ボタン IE11
 PWM制御方法:スライダー chrome PWM制御方法:スライダー IE11
 Raspberry メニューに戻る